Update: Part 2 of this project is now up! Check out [Square Foot Gardening (Part 2): Designing an Automated Irrigation System for Raised Beds] to see how we trenched the lines, ran the plumbing, and built out the drip irrigation grid.
They say gardening is a way to save money, but if you’ve ever walked into a garden center unprepared, you know how fast a small project like a square foot garden can turn into a massive credit card bill.
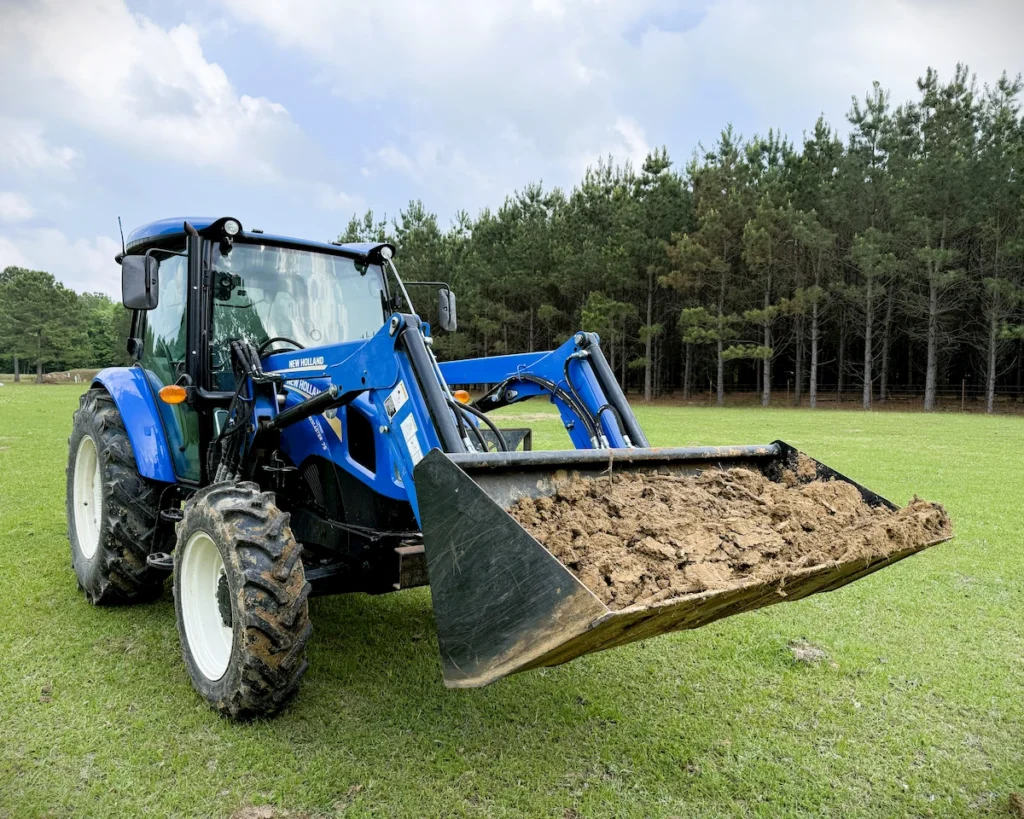
If you saw my recent Facebook post with the New Holland, you might have wondered what all that dirt work was for. That day was actually the start of a quick change in plans. Our little tractor suffered a major axle seal failure right as the gardening season kicked off, and with our main workhorse sitting in the back waiting on repairs, I couldn’t work a traditional plot.
Rather than giving up, we decided to use the big tractor to prep a smaller, cleaner-looking setup that didn’t require a huge investment. By combining some Amazon finds and some smart local shopping, we built 32 square feet of growing space for a very reasonable price.
Base Layer: Groundwork for a Productive Edible Garden
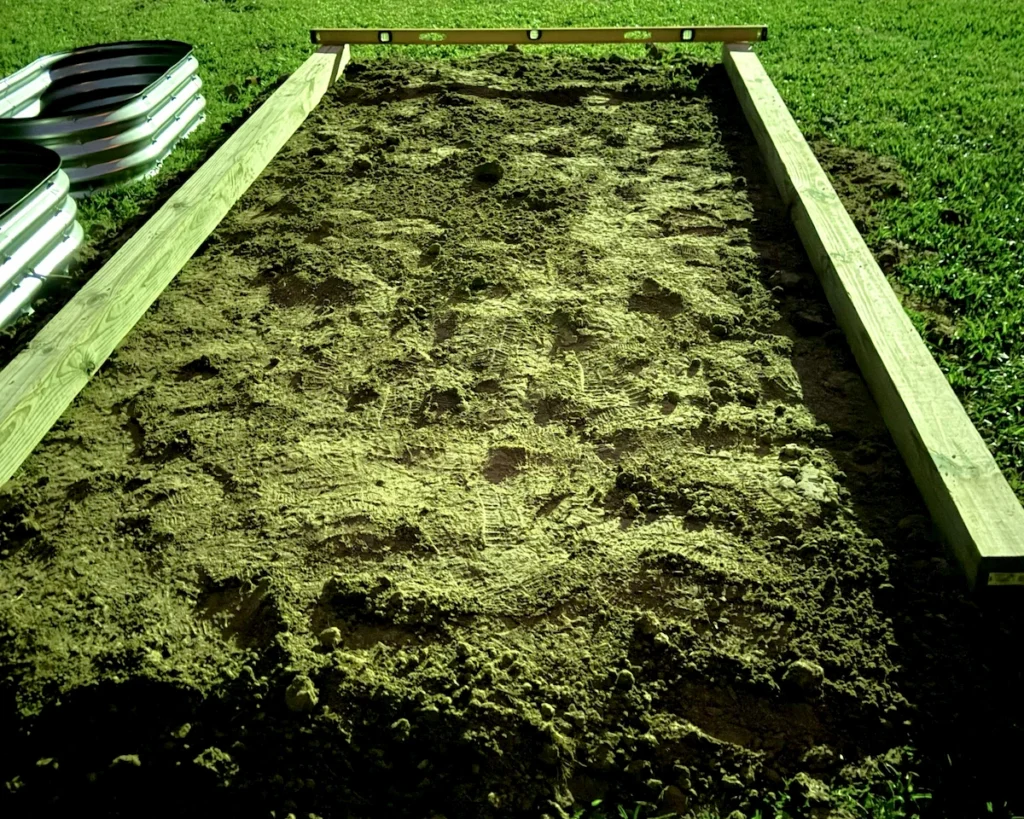
Before we could build up, we had to level out. Since the little tractor was down, we used my brother’s New Holland to haul in the fill dirt and get a flat foundation. These galvanized beds have open bottoms, which is great for drainage, but it means your site has to be level so the soil doesn’t wash out during a heavy rain.
Working Into the Night
Using the big tractor to move the bulk of the dirt was the easy part. The real work was the rest of that afternoon and evening spent with a rake and a shovel. We stayed out long after the sun went down to make sure the pad was actually flat. We laid the 10-foot 4x4s across the site with a level to check our work. If you don’t get this part right, the whole project looks sloppy at the end. Taking the time to get the ground perfectly flat made the rest of the assembly a breeze.
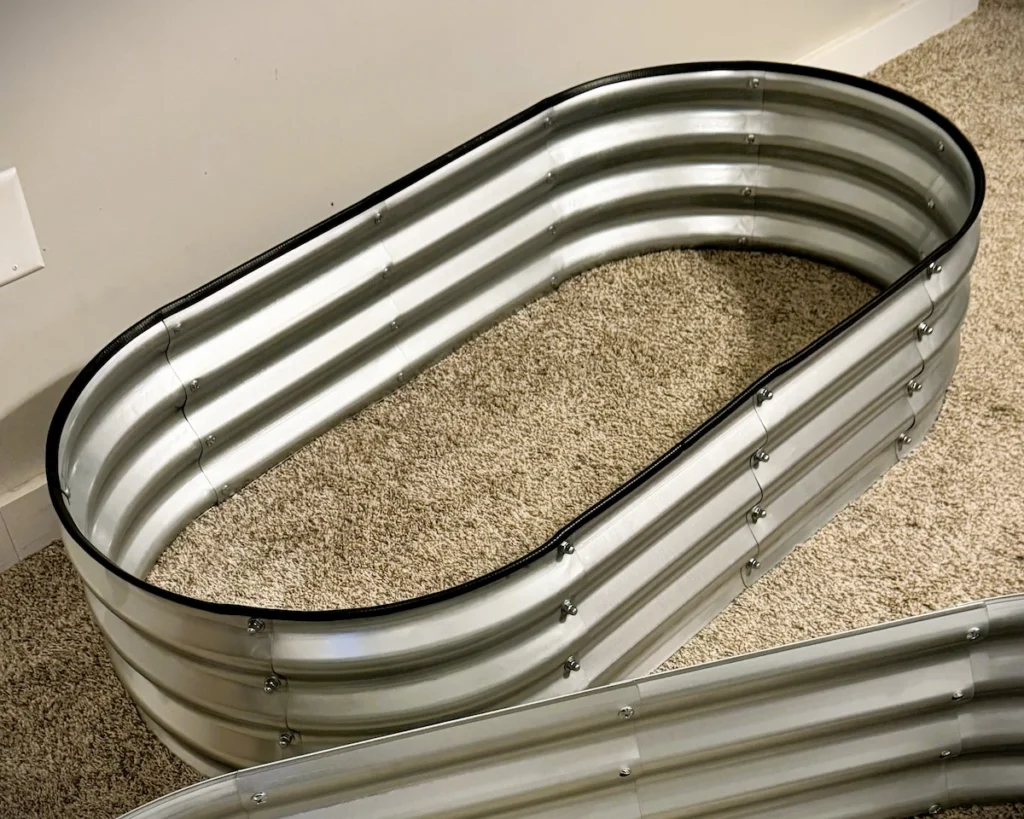
The Bones: Amazon “Faux” Stock Tanks
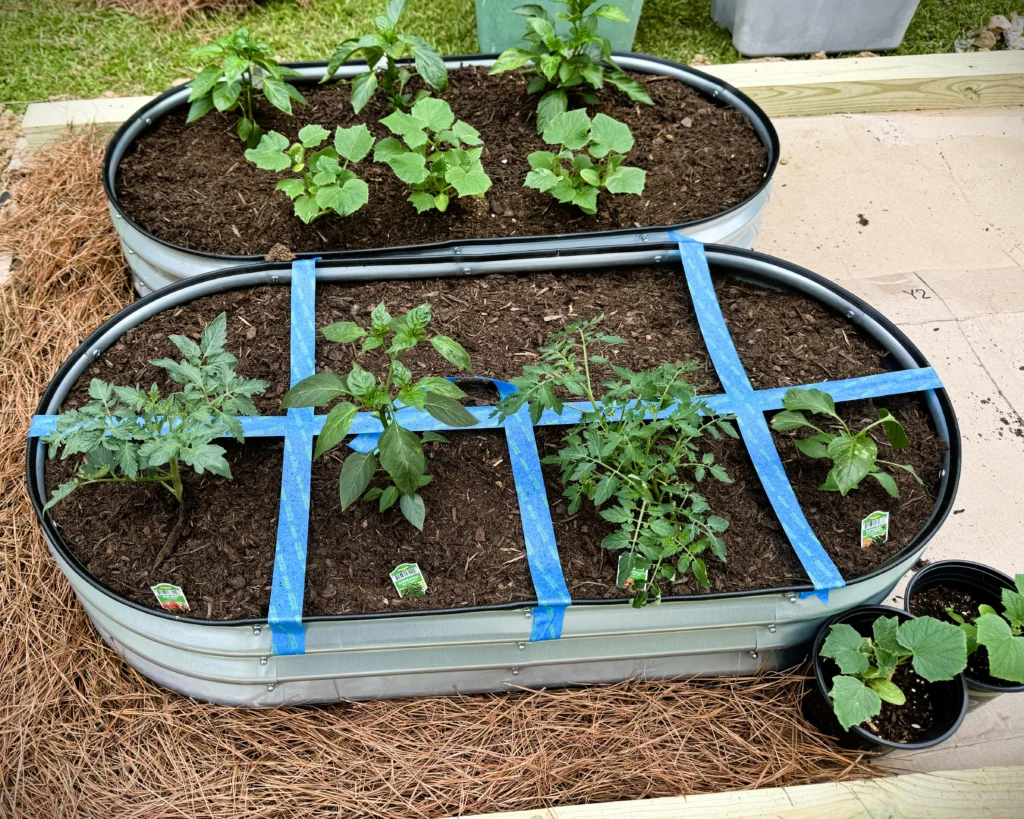
We love the look of heavy-duty stock tanks, but we don’t love the high price tag or the weight. Cerinia found these Kesfitt Galvanized Steel beds on Amazon. By grabbing them in sets of two, the cost per tank was significantly lower than buying them individually. They are 4x2x1 feet, making them the perfect size for a standard 8-square-foot grid. They’re lightweight to assemble but give you that clean look once they’re in place.
The Design Flourish: Built for Easy Mowing
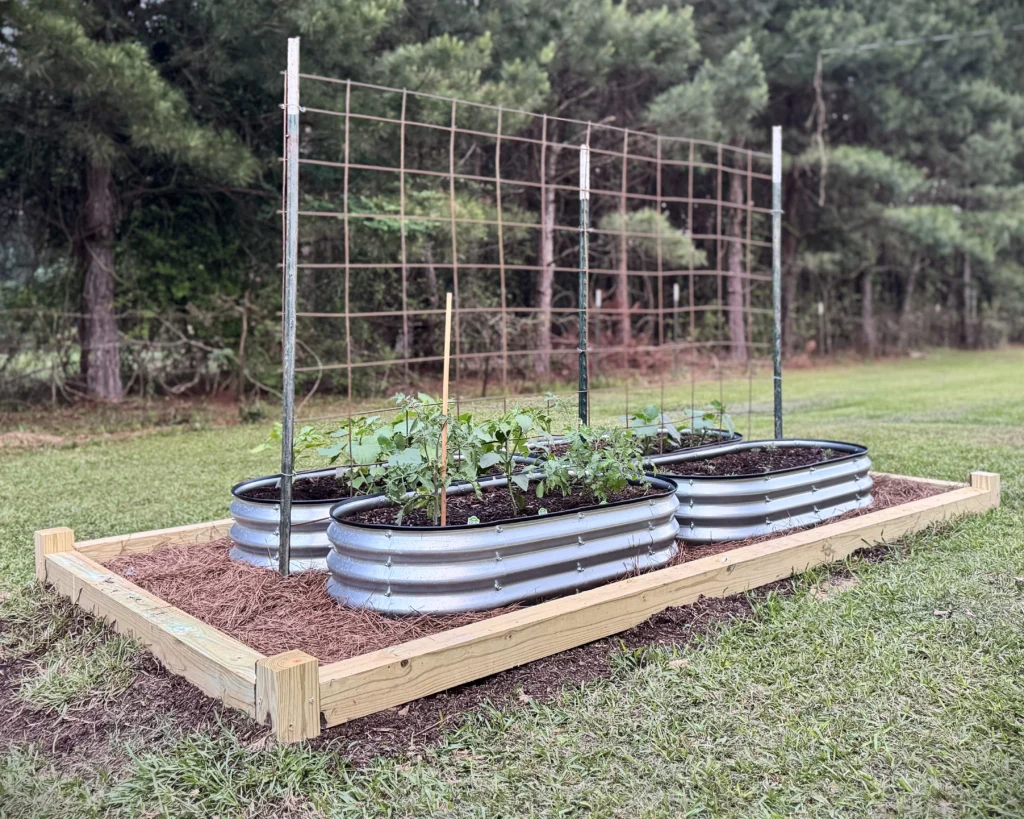
To make the metal beds feel like a permanent part of the landscape, we framed the whole area in 4×4 posts. We used three 10-foot posts and one 8-foot post. Eight feet was the shortest length Home Depot sold, but we only used two feet of that post. We simply cut four 6-inch vertical pillars to anchor the corners. These pillars hide the seams and give the garden a custom look for very little extra cost in lumber. One of the 10-foot posts was cut in half to make the two ends making the entire bed 5×10 feet.
Aside from the looks, this frame saves us a headache every weekend. It creates a solid strike zone that makes it so much easier to mow the lawn. We can trim right up against the heavy timber without worrying about dinking the metal beds or blowing grass clippings into the soil.

The Foundation: Smart Soil Shopping and Zero-Waste Weed Control
This is where we played it smart to keep the budget under control. We shopped around locally and found a deal on 1.5 cu. ft. bags by buying in bulk. We needed 18 bags to fill all four tanks. Catching a local sale saved a fortune compared to standard nursery prices.
For the base, we used flattened cardboard boxes to kill the grass. We were careful to use unprinted brown cardboard only, no dyes, no inks, and no tape. It’s a chemical-free way to feed the worms while stopping the weeds. Instead of buying bags of dyed mulch, we gathered pine straw from the trees around our property. It’s free and looks much more natural against the silver metal.
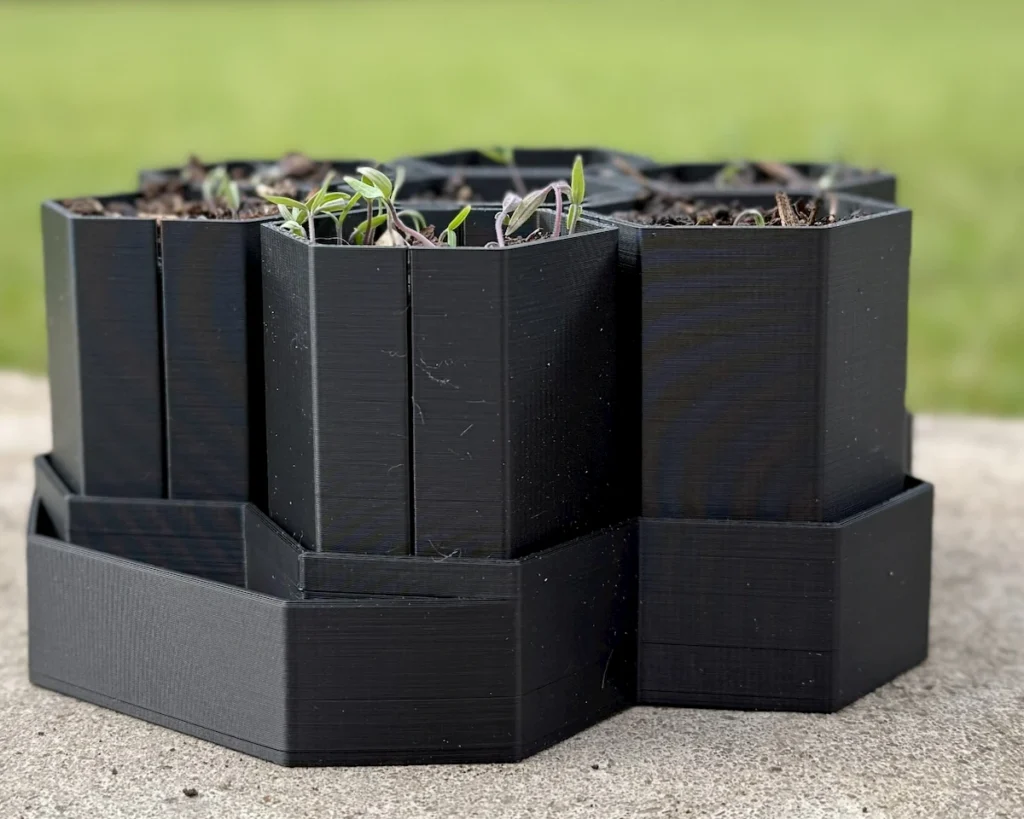
The High-Tech Garden: 3D-Printed Snap-Pods
We wanted to save money on plants, so we turned to our 3D printer. We found a brilliant design on MakerWorld for snap-apart seed pods. Unlike the flimsy plastic pots from the store, these snap open so you can transplant the seedling without damaging the roots. It kept our plant cost down to a little bit of filament and the seeds were harvested from tomatoes that we already had to eat.
The Vertical Advantage: A Salvaged Cattle Panel Trellis
You can’t have a square foot garden without thinking about vertical space. Instead of buying a flimsy trellis, we went out to our old corral/loading chute where there was an old heavy-duty cattle panel and “rescued” it from the vines and roots grown through it. This thing wasn’t going to give up without a fight though. We spent an hour removing it from the vines and tree roots that had woven through the mesh over the years.
Once we got it free we spent some time straightening it out and used an angle grinder with a cut-off wheel to cut a clean 8-foot section to run the full length of the garden. To make it rock-solid, we used some old T-posts lying around and drove them deep into the pad. We mounted the panel to the posts, creating a trellis that can handle the heaviest harvest without budging. It’s indestructible, functional, and best of all, it didn’t cost us a dime for this project.
The Final Receipt
We got one small lucky break with the planting this year. Our cucumbers actually sprouted up as volunteers from my mom’s last year’s garden, so we transplanted those for free. We only had to buy six nursery starts (tomatoes and peppers) to fill in the rest.
| Item | Source | Estimated Cost |
| 4 Galvanized Beds | Amazon (two Kesfitt 2-packs) | $110 |
| 18 Bags of Garden Soil | Lowes Building Center (Bulk Sale) | $145 |
| 4×4 Timber Framing | Home Depot (Three 10ft, One 8ft) | $65 |
| Cattle Panel Trellis | Salvaged (Old Corral/Loading Chute) | FREE |
| T-Posts | Recycled (Lying around the farm) | FREE |
| 6 Nursery Starts | Lowes Building Center | $25 |
| Volunteer Cucumbers | From Mom’s Last Year’s Garden (Transplanted) | FREE |
| Weed Barrier & Mulch | Unprinted Cardboard & Pine Straw | FREE |
| Seed Starter Pods | 3D Printed (MakerWorld Design) | < $1 |
| Total Project Cost | ~$350 |
Final Thoughts: Gardening with a Little Ingenuity
This project showed us that a high-quality garden is more about ingenuity than a massive budget. When the tractor broke down and our original plan hit a standstill we had to get creative. We stayed under budget by snagging the galvanized tanks and bulk soil on sale, filled the gaps with what we already had on hand, and a small lumber purchase. By rescuing a cattle panel from the woods, using reclaimed T-posts, and laying down cardboard and pine straw for a clean finish, we built a professional-looking space without the hefty price tag.
From 3D printing our own pods to repurposing old metal, this garden is proof that you can build something great with just a bit of sweat, some forgotten materials, and a little bit of creative ingenuity. If you have some surplus supplies lying around, grab your tools and see what you can create.
Happy planting!
While you’re here:
Once you’re finished in the garden and the hard work is done, you might want to check out some of these:
- Cast Iron Enchiladas: These are amazing and a perfect way to use up fresh peppers and onions once they start coming in.
- Atlanta State Park: A great local spot to get away for a bit while you’re waiting for those seeds to sprout.
- All Site Reviews: My full list of park and location reviews.